Que's Blog

WebFrontEnd Development

0%

React Diff算法

React Diff算法

算法对比

传统树对比O(N^3)算法

计算一棵树形结构转换成另一棵树形结构的最少操作。传统diff 算法通过循环递归对节点进行依次对比,效率低下,算法复杂度达到 O(n^3)。

这里仅仅简单列一下其原理上的复杂度。其基本原理是先寻找差异,然后计算计算最小转换方式。其中寻找差异的做法是遍历旧的树上的每一个节点,和新的树节点上每个节点遍历对比,这是为了寻找差异节点(判断是不是移动到那个位置去了),仔细思考一下就可以知道这个过程的算法复杂度已经达到O(N^2), 找到这个差异节点之后还要计算最小的转换方式,最终复杂度为O(N^3)——这个从O(N^2)到O(N^3)的过程是一个复杂且值得研究的问题,这里就不做钻研了。

React Diff的O(N)算法

传统的树对比算法实际上就问题本质的研究来说已经是最理想了,但是这里需要更加高效的算法。算法本身没问题,所以需要对问题本身做出限制以便生成更高效的方案,幸运的是React虚拟DOM方案可以根据方案需要本身做出预设以完成这个设想,并且这些设想经过无数WEB开发的验证证明是合理的。

针对算法复杂度太高的问题,FB的开发者做出了三个预设:

  • 跨层级操作少到忽略不计——所以对比算法只需要对比树当前所在的层级
  • 不同类型(Component)的树有不同的结构,这是在虚拟DOM层次上的设计
  • 同层级的节点通过设置唯一key识别——不需要遍历当前层所有的节点

基于这三个假设,diff算法分为Tree Diff、Component Diff、Element Diff三个层面。

这里且不通过代码而是从理论上进行分析它是如何实现让这个算法达到O(N)的——实际上上面已经把所有已经指出了,这里再分析一次。

首先预设1和预设2完美将整个对比压平成了N,他们一个使对比不需要多层级对比,一个通过Key使得同层级的节点通过自身的Key就能直接找到变化后的节点。这算是Tree Diff。

而Component Diff这个算法的预设是针对不同组件涉及了不同的树结构,这样进一步在最小转换上提高了效率减少了对比误差——而一旦确认了是不同组件,那么React在这个最小转换方式计算上采取了最高效粗暴的方式对这个节点以及下层所有节点整个删除+替换

反之,如果是相同的组件,那么就会进入Element Diff这个层面,ReactDomComponent本质上是没有Diff的(因为一旦更新那肯定是直接就替换式更新了),但是可以在更新前判定更新谁删除谁添加谁,这是Element Diff的意义所在。

实现过程

Component Diff

这一块逻辑就3个:

  • 如果是相同类型,继续进行比较(这个比较可能是根据元素类型进行3种比较策略的组合)

  • 如果不同类型 直接替换后面子节点(ReactCompositeComponent._updateRenderedComponent)

    1
    2
    3
    4
    5
    6
    7
    8
    9
    10
    11
    12
    13
    14
    15
    16
    17
    18
    19
    20
    21
    22
    23
    24
    25
    // 已删除细节代码  
    _updateRenderedComponent: function(transaction, context) {
    if (shouldUpdateReactComponent(prevRenderedElement, nextRenderedElement)) {
    ReactReconciler.receiveComponent(
    prevComponentInstance,
    nextRenderedElement,
    transaction,
    this._processChildContext(context),
    );
    } else {
    var nextMarkup = ReactReconciler.mountComponent(
    child,
    transaction,
    this._hostParent,
    this._hostContainerInfo,
    this._processChildContext(context),
    debugID,
    );
    this._replaceNodeWithMarkup(
    oldHostNode,
    nextMarkup,
    prevComponentInstance,
    );
    }
    }
  • shouldComponentUpdate Hook函数自行设置是否更新

关于更新渲染是如何产生的,可以看React生命周期分析里面的部分。这里直说结论,回到组件层面,不管是state更新还是props更新,它最终会执行到ReactCompositeComponent.updateComponent

PS: 可能React生命周期分析里面关于props更新关联了state会让人疑虑,那么可以仔细看看React生态 react-redux|redux-saga加以思考,大家会发现,不管props还是state的更新,归根结底还是setState触发的更新。在React-Redux也无非是在自定义组件上层的connect返回的HOC里面执行了setState。

下面看看源代码这块,看看调用路径:

1
2
3
4
5
6
7
8
ReactCompositeComponent.updateComponent
->ReactCompositeComponent._updateRenderedComponent
-> ReactCompositeComponent.receiveComponent
-> ReactCompositeComponent.updateComponent
->ReactCompositeComponent._performComponentUpdate
->ReactCompositeComponent._updateRenderedComponent
->internalInstance.receiveComponent
->internalInstance.updateComponent

这里调用上有一些地方值得注意ReactReconciler.receiveComponent接到的参数是一个nextElement也就是新元素做对比,ReactReconciler.updateComponent则接受这两个新旧element进行对比,但是在这两个函数调用和定义上。前者是调用后者时候传入的是两个新旧元素,但是后者参数逻辑上,是视为新旧ParentElement处理。

截下来是ReactCompositeComponent._performComponentUpdate,这个函数接受element、props、state,将其赋值给当前自定义组件(就虚拟DOM来讲,这样就已经更新完毕了),然后调用_updateRenderedComponent进行更新。这个函数就是调用它的render函数并更新对应DOM了。用于对比度新旧元素。这是该函数对比的元素:

1
2
var prevRenderedElement = prevComponentInstance._currentElement;
var nextRenderedElement = this._renderValidatedComponent();

因为这新旧两个节点都是一棵虚拟DOM树,这棵树是多种节点的组合。此时我们就可以进行Tree Diff分析了。

Tree Diff

续接ComponentDiff的逻辑,当_updateRenderedComponent执行时候,核心调用是

1
2
3
4
5
6
ReactReconciler.receiveComponent(
prevComponentInstance,
nextRenderedElement,
transaction,
this._processChildContext(context),
);

而这个ReactReconciler.receiveComponent函数调用里面,核心代码如下

1
2
3
4
5
6
7
8
9
10
11
12
13
14
15
16
17
18
19
20
21
 receiveComponent: function(
internalInstance,
nextElement,
transaction,
context,
) {
var prevElement = internalInstance._currentElement;
// 如果两个元素完全一样 且 上下文不变,那么什么都不做
if (nextElement === prevElement && context === internalInstance._context) {
return;
}
// 否则进行更新
internalInstance.receiveComponent(nextElement, transaction, context);
if (
refsChanged &&
internalInstance._currentElement &&
internalInstance._currentElement.ref != null
) {
transaction.getReactMountReady().enqueue(attachRefs, internalInstance);
}
},

这里更新调用的internalInstance.receiveComponent,这个internalInstance 最常见、主要的指向是ReactCompositeComponent 和 ReactDomComponent这种。

这里把关注点重新放到_updateRenderedComponent函数里面两个新旧元素上,一如ComponentDiff里面提到的。不管是_currentElement还是this._renderValidatedComponent(实质上就是对this._instance.render()的包装),返回都是自定义组件的render执行结果(这里必须意识到上级render会递归将子节点的render全部递归执行到根节点位置然后冒泡将值递归返回回来),也就是说,可以理解他们进行了脱壳(因为对比的是render结果,而不是该组件本身),返回了其下级虚拟dom节点。

再看看这个函数简略代码:

1
2
3
4
5
6
7
8
9
10
11
12
13
_updateRenderedComponent: function(transaction, context) {
var prevComponentInstance = this._renderedComponent;
var prevRenderedElement = prevComponentInstance._currentElement;
var nextRenderedElement = this._renderValidatedComponent();
if (shouldUpdateReactComponent(prevRenderedElement, nextRenderedElement)) {
ReactReconciler.receiveComponent(
prevComponentInstance,
nextRenderedElement,
transaction,
this._processChildContext(context),
);
}
}

所以,一个正常更新的ReactCompositeComponent节点,在更新执行到这个环节时候,一定会执行到这个ReactReconciler.receiveComponent指向ReactDomComponent.receiveComponent那一刻——因为即使不论你的自定义组件如何复杂,即使它们一个嵌套一个(此时ReactReconciler.receiveComponent持续指向ReactCompositeComponent.receiveComponent,两个receiveComponent递归调用),最坏的情况是执行到终点的render,也必然会指向一个ReactDomComponent。

所以这里关注点可以放到ReactDomComponent.receiveComponent上来了。

接下来这里需要关注的调用栈:

1
2
3
4
ReactDomComponent.receiveComponent
->ReactDomComponent.updateComponent
->ReactDomComponent._updateDOMChildren
->ReactChildReconciler.updateChildren

仔细看了一下源码,同层级对比这个环节在ReactChildReconciler.updateChildren中。

1
2
3
4
5
6
7
8
9
10
11
12
13
14
15
16
17
18
19
20
21
22
23
24
25
26
27
28
29
30
31
32
33
34
35
36
37
38
39
40
41
42
43
44
45
46
47
48
49
50
51
52
53
54
55
56
57
58
59
60
61
62
63
64
65
66
67
68
69
70
71
72
updateChildren: function(
prevChildren,
nextChildren,
mountImages,
removedNodes,
transaction,
hostParent,
hostContainerInfo,
context,
selfDebugID, // 0 in production and for roots
) {
if (!nextChildren && !prevChildren) {
return;
}
var name;
var prevChild;
// 遍历新节点树
for (name in nextChildren) {
if (!nextChildren.hasOwnProperty(name)) {
continue;
}
// 遍历nextChildren key并获取节点相同key属性
prevChild = prevChildren && prevChildren[name];
var prevElement = prevChild && prevChild._currentElement;
var nextElement = nextChildren[name];
if (
// 两个目标元素都同时存在 且 shouldUpdateReactComponent返回true
prevChild != null &&
shouldUpdateReactComponent(prevElement, nextElement)
) {
// 旧节点更新
ReactReconciler.receiveComponent(
prevChild,
nextElement,
transaction,
context,
);
nextChildren[name] = prevChild;
} else {
if (prevChild) {
removedNodes[name] = ReactReconciler.getHostNode(prevChild);
ReactReconciler.unmountComponent(prevChild, false);
}
// The child must be instantiated before it's mounted.
// 重新实例化节点并替换
var nextChildInstance = instantiateReactComponent(nextElement, true);
nextChildren[name] = nextChildInstance;
// Creating mount image now ensures refs are resolved in right order
// (see https://github.com/facebook/react/pull/7101 for explanation).
var nextChildMountImage = ReactReconciler.mountComponent(
nextChildInstance,
transaction,
hostParent,
hostContainerInfo,
context,
selfDebugID,
);
mountImages.push(nextChildMountImage);
}
}
// Unmount children that are no longer present.
for (name in prevChildren) {
if (
prevChildren.hasOwnProperty(name) &&
!(nextChildren && nextChildren.hasOwnProperty(name))
) {
prevChild = prevChildren[name];
removedNodes[name] = ReactReconciler.getHostNode(prevChild);
ReactReconciler.unmountComponent(prevChild, false);
}
}
},

代码并不长 主要是进行了同层级对比。如果两个目标元素都同时存在并且shouldUpdateReactComponent返回true,那么调用ReactReconciler.receiveComponent进行更新。否则则通过instantiateReactComponent生成新的React元素并渲染替换原来的(通过removedNodes进行收集并在后面一起unmountComponent)。

而取消跨层级对比这个,实质上是通过良好的规划解决了。比如上一节提到的Component Diff,它对比的是inst._currentElement和render返回值。相同的类型它会一直ReactReconciler.receiveComponent调用直到终点,开始或者中途因为组件不同,那么直接覆盖替换。

由于变更是一个从父组件到子组件一直到最终节点的过程,所以ReactReconciler.updateChildren在运行过程中调用ReactReconciler.receiveComponent最终在遇到还有下层节点时候回返回再次调用自身一直到最终节点。

另外就是这个updateChildren会维护一个removedNodes数组,并在这个调用过程中会一路以参数形式往下传递直到最终节点一起unMound。那么这个removedNodes从哪开始呢?从ReactMultiChild.updateChildren开始。我们梳理一下调用路径,知道这个removeNodes如何维护的还是很重要的:

1
2
3
4
5
6
7
8
9
10
11
12
13
14
15
16
17
18
19
20
21
22
23
24
25
26
27
ReactMultiChild.updateChildren
->ReactMultiChild._updateChildren ->声明:removedNodes = {}
-->ReactMultiChild._reconcilerUpdateChildren() <- 传入:removedNodes = {};
---->ReactChildReconciler.updateChildren
// 该函数在该逻辑的核心代码
ReactChildReconciler.updateChildren () {
for (name in nextChildren) {
if (
prevChild != null &&
shouldUpdateReactComponent(prevElement, nextElement)
){
ReactReconciler.receiveComponent(
prevChild,
nextElement,
transaction,
context,
);
} else {
if (prevChild) {
// removedNodes是被传入前是一个对象(引用类型) 传值参考"Call By Share"
// 总之它会直接修改来自ReactMultiChild._updateChildren的removedNodes值
removedNodes[name] = ReactReconciler.getHostNode(prevChild);
ReactReconciler.unmountComponent(prevChild, false);
}
}
}
}

Tree Diff时候就直接计算出nextChild中有、prevChild也有、但是不相等的节点,存到removeNodes中。

这里实际上不会如传统的算法那么追求完美,就像之前提到的,他基本上遇到新的树上出现新的节点后如果在旧的节点上查到同名的,那么会进行shouldUpdateReactComponent判断,这个判断涉及主要设计type&key。

1
2
3
4
5
6
7
8
9
10
11
12
13
14
15
16
17
18
19
function shouldUpdateReactComponent(prevElement, nextElement) {
var prevEmpty = prevElement === null || prevElement === false;
var nextEmpty = nextElement === null || nextElement === false;
if (prevEmpty || nextEmpty) {
return prevEmpty === nextEmpty;
}

var prevType = typeof prevElement;
var nextType = typeof nextElement;
if (prevType === 'string' || prevType === 'number') {
return nextType === 'string' || nextType === 'number';
} else {
return (
nextType === 'object' &&
prevElement.type === nextElement.type &&
prevElement.key === nextElement.key
);
}
}

如果没有的话直接生成新的并挂载。

Tree Diff到这里应该可以结束了,接下来是Element Diff。

Element Diff

这个Element Diff包括三种操作: 插入、删除、移动。这里为了方便表述先说移动。

移动

这里需要强调的是这个算法,属于同层级下的子节点对比算法。

接上一节的调用路径,这里接下路径是:

1
2
3
4
ReactDomComponent.receiveComponent
->ReactDomComponent.updateComponent
-> ReactDomComponent._updateDOMChildren
-> ReactMultiChild._updateChildren

ReactDomComponent.updateComponent这个函数核心调用之前文章有提到过,是

1
2
this._updateDOMProperties(lastProps, nextProps, transaction);
this._updateDOMChildren(lastProps, nextProps, transaction, context);

_updateDOMChildren里调用的this.updateChildren(nextChildren, transaction, context);方法,来自ReactMultiChild.Mixin。这个函数里面完整的实现了Element Diff。

关于Element Diff,可以这么说,我们进行Tree Diff和Component Diff是从顶层设计上降低了算法复杂度,而Element Diff则是那个跑前跑后赚辛苦钱的那个小喽啰,当然,这并不是说它不重要,反而正是在突出其工作的相对复杂性。理解这段话,可以理解为Tree Diff和Component Diff是深谙其中五味的领导,为办事员指明了工作最优方向,但是对于办事员来讲,让然跑不了领导一张嘴下面跑断腿的情景。

关于这个算法,《深入React技术栈》有非常详尽的说明,但是个人觉得如果基于硬啃每一行代码的角度去理解算法的话,理解这个diff算法反而变得过于复杂了。

基于《深入React技术栈》的例子这里自己说下对这个算法排序上的理解。

example

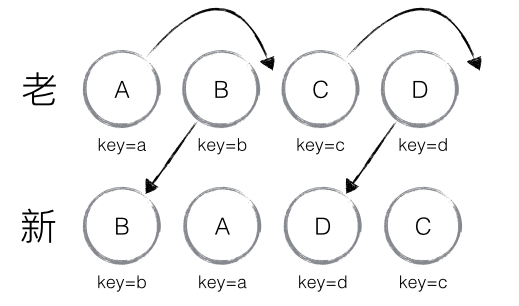
新旧节点的例子就是如上图所示,我们从ABCD变成了BADC这样的结构,这个算法最后计算出的差异是移动A和C到对应位置。这里问题是如何进行这个计算。

这里我们可以假设ABCD分别代表一个常数变量

1
2
3
4
5
// 旧节点 此时最优排序是 ABCD 可以设其分别为0123四个值
A B C D
// 新节点 此时最优排序是 BADC 为了实现排序 就可以设ABCD分别为1032
B A D C // 当ABCD按照值大小排序完毕 就是BADC的顺序了
// 这里设置一个排序规则: 使ABCD根据其代表的值进行排位。这样就可以进行抽象排序了。

这里就可以逆向思考一下,React是如何设计这个算法了。当我们重设了ABCD的值,计算新的顺序和现有顺序差异时候,并且将要排序但是还没排序时候,下面对应的索引、值、元素是按下面关系对应的:

1
2
3
4
5
index  0 1 2 3
A B C D
value 1 0 3 2

done: B A D C

此时很容易发现了,我们的value的值实际上就是每个元素排序后应该所处的索引,而事实上的索引,则是排序之前的索引。我们需要做的,是把索引正确的(value < index)放着不动,而把错误的(value > index)挑出来,并把排序方案记录下来。

这里操作办法很简单,如果当前值比索引大,那么说明这个位置是错误的需要移动,把这个值移动到值对应的索引上,如果值比当前索引小,那么说明可以不动它(这里采取只移动实际位置比自己正确位置靠前的元素的策略,当把这些元素一一归位到对应值的索引的时候,这个排序就完成了)。

但是这里需要说一下,当我们进行对比的时候,实际上BADC的顺序已经是确定的,我们实际的路径是已知变动后的BADC和变动前的ABCD,求这个变动的最小集合。这个过程中,已经确定变动后的BADC的顺序,可以理解成,上诉排序中,对ABCD重新赋值的过程。

这里看看关于移动的核心代码

1
2
3
4
5
6
7
8
9
10
11
12
13
14
15
16
17
18
19
20
21
22
23
24
25
26
27
28
29
30
31
32
33
34
35
36
37
38
// 核心代码
var nextIndex = 0;
var lastIndex = 0;
for (name in nextChildren) {
var prevChild = prevChildren && prevChildren[name];
var nextChild = nextChildren[name];
if (prevChild === nextChild) {
updates = enqueue(
updates,
this.moveChild(prevChild, lastPlacedNode, nextIndex, lastIndex), // 标记移动
);
lastIndex = Math.max(prevChild._mountIndex, lastIndex);
prevChild._mountIndex = nextIndex;
}
}
nextIndex++;

// 用到的调用函数
moveChild: function(child, afterNode, toIndex, lastIndex) {
// If the index of `child` is less than `lastIndex`, then it needs to
// be moved. Otherwise, we do not need to move it because a child will be
// inserted or moved before `child`.
if (child._mountIndex < lastIndex) {
return makeMove(child, afterNode, toIndex);
}
}
// 用到的调用函数
function makeMove(child, afterNode, toIndex) {
// NOTE: Null values reduce hidden classes.
return {
type: 'MOVE_EXISTING',
content: null,
fromIndex: child._mountIndex,
fromNode: ReactReconciler.getHostNode(child),
toIndex: toIndex,
afterNode: afterNode,
};
}

这里简要分析一下,moveChild函数判断child._mountIndex < lastIndex,如果符合条件那么调用makeMove将这个元素标记为移动。这个移动过程和上面提到的原理是一致的,唯一需要理解的是nextIndexlastIndex两个变量。这里代码上差异分析过程是以新的BADC为目标,分析ABCD到BADC的过程。

这里可以简单代入分析一下。

  • 首先按BADC顺序,取B(排序后index也就是nextIndex === 0), 这时候,此时prevChild._mountIndex也就是key为1,此时mounIndex(1) > lastIndex(0) 不满足移动标记条件,不标记。lastIndex=0。

    • lastIndex = Math.max(prevChild._mountIndex, lastIndex);设置lastIndex为遍历过得节点里mountIndex的最大值。

    • prevChild._mountIndex = nextIndex;虚拟dom上节点完成移动。

      这里要注意到nextIndex是满足条件后 要移动到的索引值。lastIndex则记录遍历过的节点在旧结构中的最大索引值。nextIndex相当于之前ABCD=0123赋值过程中的index, lastIndex则相当于value。

  • 取A(nextIndex === 1),同上此时mounIndex(0) < lastIndex(Math.Max(0, 1) === 1),那么标记A从0移动到1,lastIndex=1。

  • 取D(nextIndex === 2),此时mounIndex(3) = lastIndex(Math.Max(3, 2) === 3), 不标记。lastIndex=3。

  • 取C(nextIndex === 3),此时mounIndex(2) < lastIndex(Math.Max(2, 3) === 3), 标记移动到3,lastIndex = 2。

这里需要重点理解lastIndex,它的意义在于确保设置一个动态的值用于对比。当我们根据新的结构按照nextIndex累加往后移动计算差异时候,我们必须有一个尺度用来进行排序,这和我们之前给ABCD重新赋值是一个道理。只不过这里采用了lastIndex的方式。

lastIndex在这里,记录了最大的prevChild._mountIndex,它配合从0开始累加的nextIndex,顺序将新节点在旧结构中的索引记录下来(如果它比前面的都更大,否则忽略),然后随着nextIndex累加,新结构中的节点一一出现,如果它的mountIndex小于这个lastIndex,就统统往后移动,否则就不需要移动。

这里再来两个例子看看,这里需要注意,只有<符号出现才需要移动,x代表不需要移动,*表示需要标记移动

1
2
3
4
5
6
7
8
9
10
11
12
13
14
15
16
// 例子1: 12345 => 53421 
1 2 3 4 5

4>0 2<4 3<4 1<4 0<4
x * * * *

5 3 4 2 1

// 例子2: 12345 => 14253
1 2 3 4 5

0=0 3>0 1<3 4>3 2<4
x x * x *

1 4 2 5 3

插入

继续刚才业务代码逻辑,这里核心是

1
2
3
4
5
6
7
8
9
10
11
12
13
14
15
16
17
18
19
20
21
22
23
24
25
26
27
28
29
30
31
32
33
34
35
36
37
38
39
40
41
42
43
44
45
46
47
48
49
50
51
52
53
54
55
56
57
58
59
60
61
62
63
64
65
66
67
68
69
70
71
72
73
74
75
76
77
78
79
80
// 核心业务代码
if (prevChild === nextChild) { // 如果节点更新前后没有变化
// 略 这里是移动逻辑
} else { // 如果有变化
if (prevChild) { // 关注点:A 如果该节点在变化之前也有
// Update `lastIndex` before `_mountIndex` gets unset by unmounting.
lastIndex = Math.max(prevChild._mountIndex, lastIndex);
// 通过遍历 removedNodes 删除子节点 prevChild
}
// The child must be instantiated before it's mounted.
updates = enqueue(
updates,
this._mountChildAtIndex(
nextChild,
mountImages[nextMountIndex],
lastPlacedNode,
nextIndex,
transaction,
context,
),
);
}
// Remove children that are no longer present.
for (name in removedNodes) {
if (removedNodes.hasOwnProperty(name)) {
updates = enqueue(
updates,
this._unmountChild(prevChildren[name], removedNodes[name]),
);
}
}
// 相关调用代码
_mountChildAtIndex: function(
child,
mountImage,
afterNode,
index,
transaction,
context,
) {
child._mountIndex = index;
return this.createChild(child, afterNode, mountImage);
}
// 相关调用代码
createChild: function(child, afterNode, mountImage) {
return makeInsertMarkup(mountImage, afterNode, child._mountIndex);
}
// 相关调用代码
_unmountChild: function(child, node) {
var update = this.removeChild(child, node);
child._mountIndex = null;
return update;
},
removeChild: function(child, node) {
return makeRemove(child, node);
},
// 相关调用代码
function makeInsertMarkup(markup, afterNode, toIndex) {
// NOTE: Null values reduce hidden classes.
return {
type: 'INSERT_MARKUP',
content: markup,
fromIndex: null,
fromNode: null,
toIndex: toIndex,
afterNode: afterNode,
};
}
// 相关调用代码
function makeRemove(child, node) {
// NOTE: Null values reduce hidden classes.
return {
type: 'REMOVE_NODE',
content: null,
fromIndex: child._mountIndex,
fromNode: node,
toIndex: null,
afterNode: null,
};
}

首先必须说一说,插入和删除很多时候是混合进行的。

比如我们原来结构式ABCD,后来变化成了AECD,这样在diff算法中,会删除B然后插入一个E。

和上面的移动差不多,这个操作都是标记操作,先标记B为删除,然后标记E为添加——但是不管是不是移动,这里lastIndex逻辑还是和上面一样,所以代码进入了[关注点A]标记的逻辑的话,那么说明这个节点就必须标记删除了(因为他们已经不相等了,类似上面B变成E)。关于标记添加这个很好理解,主要是拿到nextIndex和nextChild之后标记为添加就可以了。

而删除则有另外一套逻辑。

删除

删除逻辑相对复杂一些,整体逻辑是从removeNodes里面遍历,然后获取对应的变更前元素mountIndex,挨个进行标记删除。关于这个removeNodes数组,可以回过头参考Tree Diff细节。当我们开始更新时候,TreeDiff在最上游,它在最上游Diff环节已经归集好了removeNodes。

这个removeNodes归集过程参考Tree Diff环节。

更新到DOM

无论如何,浏览器不认识虚拟DOM,最终它还是要是要具现化到浏览器的UI层。

DOMChildrenOperations.js文件中DOMChildrenOperations.processUpdates内部。

1
2
3
4
5
6
7
8
9
10
11
12
13
14
15
16
17
18
19
20
21
22
23
24
25
26
27
28
29
30
processUpdates: function(parentNode, updates) {
for (var k = 0; k < updates.length; k++) {
var update = updates[k];
switch (update.type) {
case 'INSERT_MARKUP':
insertLazyTreeChildAt(
parentNode,
update.content,
getNodeAfter(parentNode, update.afterNode),
);
break;
case 'MOVE_EXISTING':
moveChild(
parentNode,
update.fromNode,
getNodeAfter(parentNode, update.afterNode),
);
break;
case 'SET_MARKUP':
setInnerHTML(parentNode, update.content);
break;
case 'TEXT_CONTENT':
setTextContent(parentNode, update.content);
break;
case 'REMOVE_NODE':
removeChild(parentNode, update.fromNode);
break;
}
}
},

这个函数被调用的路径:

1
2
3
ReactMultiChild.Minxin._updateChildren
->processQueue(this, updates)
->ReactComponentEnvironment.processChildrenUpdates(inst, updateQueue)

其中processChildrenUpdates是在ReactDefautlInject.js中注入的,最终引用的是ReactDOMIDOperations.dangerouslyProcessChildrenUpdates,这个函数里面调用了DOMChildrenOperations.processUpdates

而顶部的ReactMultiChild.Minxin._updateChildren是上面ElementDiff环节的核心调用。

最后是processUpdates函数本身, 因为做标记时候,就是按顺序进行标记加入队列,所以这个函数直接进行遍历,然后根据type进行分支处理就完事了,并不会出现意外情况。

Diff算法的层次和例子

我们已经知道了三种Diff,但是这里还是要将其思考一番,了解他们在整体上是如何运行的。

这里思考: React程序什么会进行更新?如果触发了更新三种Diff又是怎么样配合运作的呢?

分析一

这里写个例子:

1
2
3
4
5
6
7
8
9
10
11
12
13
14
15
16
17
18
19
20
21
22
23
24
class Bar extends React.Component {
render () {
return <div>bar</div>
}
}

class Foo extends React.Component {
state = {
index: 1
}
onClick = () => {
this.setState(
index: this.state.index + 1
)
}
render () {
<div>
<button onClick={this.onClick}>click me</button>
<span>Foo, Index: {this.state.index}</span>
<Bar />
</div>
}
}
ReactDom.render(Foo, document.body);

当按钮被点击,此时Diff是如何计算呢?可以参考之前提到的声明周期的文章,当setState被触发,那么组件会被标记脏组件,然后后面会调用runBatchedUpdates批量更新。接下最后每个脏组件会被遍历,然后调用internalInstance.performUpdateIfNecessary(transaction);。就本例来讲,他会遵循下面的调用栈

1
2
3
4
5
6
7
8
ReactCompositeComponent.performUpdateIfNecessary
->ReactReconciler.receiveComponent
->ReactCompositeComponent.receiveComponent
-> ReactCompositeComponent.updateComponent
->ReactCompositeComponent._performComponentUpdate
->ReactCompositeComponent._updateRenderedComponent
->internalInstance.receiveComponent
->internalInstance.updateComponent

后面这一截调用栈和ComponentDiff一致。

此时第一时间触发的是ComponentDiff。此时这个internalInstance明显指向ReactCompositeComponent

调用路径:

1
2
3
4
5
6
7
// ComponentDiff
ReactCompositeComponent.updateComponent
->ReactCompositeComponent._updateRenderedComponent
-> ReactCompositeComponent.receiveComponent
-> ReactCompositeComponent.updateComponent
->ReactCompositeComponent._performComponentUpdate
->ReactCompositeComponent._updateRenderedComponent

到了这里,接下就是TreeDiff,此时_updateRenderedComponent对比的是新旧Foo节点。这个节点的结构是:

1
2
3
4
5
<div> // A
<button onClick={this.onClick}>click me</button> // B
<span>Foo, Index: {this.state.index}</span> // C
<Bar /> // D
</div>

因为节点变化了,所以这个ReactDomcomponent要开始进行对比。也就是ReactDomComponent.receiveComponent开始执行。

路线:

1
2
3
4
5
// Element Diff
ReactDomComponent.receiveComponent
->ReactDomComponent.updateComponent
-> ReactDomComponent._updateDOMChildren
-> ReactMultiChild._updateChildren

此时这个ReactDomComponent指向A。其子节点 B & D没有变化,按照ElementDiff不变,而C变化了,实例化新节点C并标记添加,removedNodes中含有的C后面被删除

这些完成之后,通过更新到DOM,就完成了整体更新。

分析二

分析一大致的分析比较浅的DOM树。接下来分析一个相对复杂的。

1
2
3
4
5
6
7
8
9
10
11
12
13
14
15
16
17
18
19
20
21
22
23
24
25
26
27
28
29
30
31
class A extends React.Component {
render () {
return <div>A{this.props.children}</div>
}
}
class B extends React.Component {
render () {
return <div>B{this.props.children}</div>
}
}
// C D 走一样逻辑
class Foo extends React.Component {
state = {
index: 1
}
onClick = () => {
this.setState(
index: this.state.index + 1
)
}
render () {
<div> // 1
<button onClick={this.onClick}>click me</button> // 1
<span>Foo, Index: {this.state.index}</span> // 2
<A index={this.state.index}> // 3
<B><C index={this.state.index}>123</C></B>
</A>
</div>
}
}
ReactDom.render(Foo, document.body);

现在捋一下,如果点击click me按钮,会发生如下事情:

Foo启动Component Diff

然后新旧两颗VirtualDom开始进行Tree Diff, Tree Diff开始判定这两棵树下级子节点里面的差异节点。这里1不变2、3变化,所以旧节点23三个地方都会被放到removeNodes里面备删除,因为1、2节点在新旧节点里面都存在且shouldUpdateReactComponent,所以两个个节点接下来都直接触发ReactReconciler.receiveComponent,这三个节点分别是ReactDomComponent、ReactCompositeComponent。

接下来三个调用分别触发ReactDomComponent.receiveComponentReactCompositeComponent.receiveComponent

此时节点2变化的是内部文本。当ReactDomComponent.receiveComponent一路走到_updateDOMChildren,因为内部节点都是字符串所以,_updateDOMChildren执行到this.updateTextContent('' + nextContent);就结束了。

接下是节点3。因为节点3传入的props变化了,所以ReactCompositeComponent.receiveComponent,在随后的this._updateRenderedComponent调用栈中,进行了结构<div>A<B><C /></B></div>的虚拟DOM对比。

接下来因为这两棵树根节点又是ReactDomComponent又进入了ReactDomComponent.receiveComponent,此时执行到_updateDOMChildren,新旧节点就不是字符串了,所以它调用了ReactDomComponent.updateChildren,它指向ReatMultiChild.updateChildren,那么树对比开始,此时因为节点3变更了,而且新旧结构里面都有,所以React这里直接将旧的3放到removeNodes里面,然后标记新的节点3为添加。

到此时整个Diff就完事了。

 接下来我们思考: B组件并没有变更,如果我们想B不动的情况下更新C,也就是给B加上shouldComponentUpdate = () => false,会怎样去走这个Diff呢?

接着上面提到的<div>A<B><C /></B></div>的虚拟DOM对比开始。因为此时根节点又是ReactDomComponent,所以引入ReactDomComponent.receiveComponent,进而执行了_updateDOMChildren,此时这个函数执行到了this.updateChildren(nextChildren, transaction, context),也就是ReactMultiChild.updateChildren(nextChildren, transaction, context)。这个函数下级的调用里面有ReactMultiChild._updateChildren里面有一个调用:

1
2
3
4
5
6
7
8
9
10
11
12
13
14
var nextChildren = this._reconcilerUpdateChildren(
prevChildren,
nextNestedChildrenElements,
mountImages,
removedNodes,
transaction,
context,
);
// 此时。。。
_reconcilerUpdateChildren
-->ReactChildReconciler.updateChildren
---->ReactReconciler.receiveComponent
------>ReactCompositeComponent.receiveComponent
------->ReactCompositeComponent.updateComponent

最后在ReactCompositeComponent.updateComponent有这么一段:

1
2
3
4
5
6
7
8
9
10
11
12
13
14
15
16
17
18
19
20
21
22
if (shouldUpdate) {
this._pendingForceUpdate = false;
// Will set `this.props`, `this.state` and `this.context`.
// 会调用_updateRenderedComponent将ReactCompositeComponent脱壳成ReactDomComponent
// 然后ReactDomComponent.receiveComponent->ReactDomComponent._updateDOMChildren
this._performComponentUpdate(
nextParentElement,
nextProps,
nextState,
nextContext,
transaction,
nextUnmaskedContext,
);
} else {
// If it's determined that a component should not update, we still want
// to set props and state but we shortcut the rest of the update.
this._currentElement = nextParentElement;
this._context = nextUnmaskedContext;
inst.props = nextProps;
inst.state = nextState;
inst.context = nextContext;
}

很显然 第二个分支直接给旧节点进行修改赋值而没有去替换它。正常的更新则会直接用新的替代。

关于这个nextParentElement,需要清晰意思到之前在它之前调用的ReactDomComponent更新调用到的_updateDOMChildren函数,里面直接使用的nextProps.children。关于这个nextProps.children其实就是var nextChildren = this._reconcilerUpdateChildren()

这里有需要对_reconcilerUpdateChildren有个清晰认识。一方面它是diff过程中的一个环节(计算nextChildren备用),一方面它又是Diff计算的结果,它计算nextChildren过程中会也会进行Diff,然后将Diff后的结果返回来(这也是为什么, shouldComponentUpdate返回false,可以直接进行currentElement赋值的原因)。

一些小思考

  • Q: React jsx内部如何处理以下语法的:

    1
    2
    3
    4
    5
    <div>
    {
    [1, 2, 3].map(v => <div>{v}</div>)
    }
    </div>

    A: ReactMultiChild._reconcilerUpdateChildren内部flattenChildren函数的调用。

  • Q:React 虚拟Dom在Diff过程中如何处理标签单节点反复嵌套,_updateDOMChildren函数毕竟是处理多个节点的。

    A: _updateDOMChildren会调用起ReactMultiChild._reconcilerUpdateChildren,它内部包含ReactChildReconciler.updateChildren函数的调用。如下面结构

    1
    <div><div><div>1234</div></div></div>

    它会ReactChildReconciler.updateChildren会触发以下调用链:

    1
    2
    3
    4
    5
    6
    ReactDomComponent.updateChildren // 第一层
    ->_updateDOMChildren
    -->ReactDomComponent.updateChildren // 第二层
    --->updateDOMChildren
    ---->ReactDomComponent.updateChildren // 第三层
    ----->updateDOMChildren

    一直到终点进行文本节点更新。当然,如果中途第二层如果有变化,它就会直接被删除然后被新渲染的节点直接替换不走第三层了。

参考

《深入React技术栈》