Ignite简介 Ignite是一个基于ReactNative的手脚架和基础代码的生成工具, 使用它可以从0开始构建一个ReactNative的项目,并且可以为生成基础项目、为项目添加plugins,以及自动生成新页面和对应redux和相关sagas代码并自动插入到router等地方而不需要手动复制。
关于Ignite相关教程实际上早就想写一下,之前6月初通过Google搜索一直没有找到比较好用的step by step教程,然而到现在了暂时也还是没看到。索性我自己写一个吧。
安装和命令行的使用一瞥 安装
1 $ npm install -g ignite-cli
初始化新项目
添加和移除plugins
1
2
3
4
$ ignite add maps $ ignite add vector-icons $ ignite add i18n $ ignite remove i18n
自动构建代码
1
2
3
4
5
$ ignite generate screen PizzaLocationList $ ignite generate component PizzaLocation $ ignite generate map StoreLocator $ ignite generate redux home $ ignite generate saga home
前面的可能只需要知道就可以了,但是ignite generate这个命令很值得一说,因为项目开发过程中使用它可以提高很多效率避免了很多手动copy过程。
ignite generate screen 在App/Containers页面生成一个Container,这个相当于HTML里面的一个页面。
ignite generate component 在App/Components页面生成一个组件
ignite generate map 生成地图,这个暂时没用过
ignite generate redux 生成redux
ignite generate sagas 生成sagas
其次是运行环境要求reactNative的运行环境 和node环境(node7.6+, 看文档8.0+有点小问题,所以最好还是用7.6+吧)。
运行机制 在用Ignite开始做项目之前我们需要先了解一下它的结构和运行机制。
1
2
3
4
5
6
7
8
9
10
11
12
13
14
15
$ ignite new Demo 🔥 igniting app Demo ✔ using the Infinite Red boilerplate v2 (code name 'Andross') ✔ added React Native 0.47.2 in 193.29s ? Would you like Ignite Development Screens? No ? What vector icon library will you use? react-native-vector-icons ? What internationalization library will you use? none ? What animation library will you use? react-native-animatable ✔ added ignite-ir-boilerplate in 171.26s ✔ added ignite-vector-icons in 29.13s ✔ added ignite-animatable in 27.4s ✔ added ignite-standard in 64.23s ✔ configured git ✔ ignited Demo in 604.97s
项目结构 先看看第一层目录,它是这样的:
1
2
3
4
5
6
7
8
9
10
11
12
13
14
. ├── App ├── README.md ├── Tests ├── android ├── app.json ├── ignite ├── index.android.js ├── index.ios.js ├── ios ├── node_modules ├── package.json ├── storybook └── yarn.lock
所有的业务逻辑大抵都在App里面,所以重点说App里面的逻辑。
1
2
3
4
5
6
7
8
9
10
11
12
13
14
15
16
17
18
19
20
21
22
23
24
25
26
27
28
29
30
31
32
33
34
35
36
37
38
39
40
41
42
43
44
45
46
47
48
49
50
. ├── Components 组件 │ ├── SearchBar.js │ └── Styles ├── Config 配置 │ ├── AppConfig.js │ ├── DebugConfig.js │ ├── README.md │ ├── ReactotronConfig.js │ ├── ReduxPersist.js │ └── index.js ├── Containers 容器&页面 │ ├── App.js │ ├── LaunchScreen.js │ ├── README.md │ ├── RootContainer.js │ └── Styles ├── Fixtures 数据mock的本地json │ ├── README.md │ ├── gantman.json │ ├── rateLimit.json │ ├── root.json │ └── skellock.json ├── Images 图片 ├── Lib 库 │ └── README.md ├── Navigation 导航、router react-navigation │ ├── AppNavigation.js │ ├── ReduxNavigation.js │ └── Styles ├── Redux │ ├── StartupRedux.js │ └── index.js ├── Sagas │ ├── GithubSagas.js │ ├── StartupSagas.js │ └── index.js ├── Services 服务 主要是ajax,数据mock,持久化相关的逻辑层 │ ├── Api.js │ ├── ExamplesRegistry.js │ ├── FixtureApi.js │ ├── ImmutablePersistenceTransform.js │ └── RehydrationServices.js ├── Themes 主题 │ ├── ApplicationStyles.js │ ├── Colors.js │ └── index.js └── Transforms ├── ConvertFromKelvin.js └── README.md
这里仅保留大致结构,很多文件对展示结构无关紧要就删掉了,实际上还有很多图片、组件等等。这里仅做原理的分析。
由于这是一片step by step的教程式的笔记,所以主要从使用的角度做分析,不做过于复杂的分析。这个结构实际上依然是MVC结构,其中M用Redux实现、V用react-native实现、C用Sagas实现。简单说,reactNative负责了页面,redux负责向页面传递数据,而sogas则负责业务逻辑并更改redux最终实现页面的变更。
配置Ignite 这里对一些前期需要知道的文件做简要介绍。
首先是Config/DebugConfig.js,任何程序编写过程都无法跳过debug环节,对一个新程序的编写也必然需要debug来查看内部数据变化,
1
2
3
4
5
6
7
/*file:Config/DebugConfig.js*/ useFixtures: true, // 使用本地数据,这里设为true让我们可以在没有后端支持的情况实现数据mock ezLogin: false, // 暂时还不知道这个ezlogin干嘛的 yellowBox: __DEV__, // 黄屏警告 开发模式默认打开 reduxLogging: __DEV__, // redux-logging当redux变更时打log 开发模式默认打开 includeExamples: __DEV__, // 载入初始的includeExamples 开发模式默认打开 useReactotron: __DEV__ // 使用useReactotron 开发模式默认打开
这里我们打开useFixtures设为true即可。
Ignite的Sagas 接下来是C层了解下这里怎么处理的。打开Sagas/index.js,里面的内容不算复杂。需要关注的代码就三行
1
2
3
4
5
6
... const api = DebugConfig.useFixtures ? FixtureAPI : API.create() ... takeLatest(StartupTypes.STARTUP, startup) takeLatest(GithubTypes.USER_REQUEST, getUserAvatar, api) ...
这里注意到api变量, 这里是设置数据mock的关键地方, 当useFixtures设为true的时候使用FixtureAPI否则使用API.create(),这里api可以视为一个代理, 这也决定了FixtureAPI和API.create()实际上返回的数据具有相同的数据结构。
然后就是takeLatest这个辅助函数的事情了
takeEvery :允许多个 fetchData实例同时启动。在某个特定时刻,我们可以启动一个新的 fetchData任务, 尽管之前还有一个或多个 fetchData尚未结束。我认为这个函数非常适合一次性从服务器拉取多个数据,然后放到redux保存备用。takeLatest :只允许执行一个 fetchData任务。并且这个任务是最后被启动的那个。 如果之前已经有一个任务在执行,那之前的这个任务会自动被取消。
这里唯一需要说下的takeLatest参数问题了, takeLatest接受三个参数,第一个是ReduxAction, 第二个是这个ReduxAction触发的异步函数,第三个参数是可选的。当第三个参数存在,传入这个异步函数的第一个参数是传入的第三个实参,第二个是action, 如果不存在第一个就是action。就像这样:
1
2
function * startup (action) {} function * getUserAvatar (api, action) {}
这里再简单分析下数据获取的问题,参考Sagas/GithubSagas.js
1
2
3
4
5
6
7
8
9
10
11
12
13
14
15
16
17
18
19
// Sagas/GithubSagas.js import { call, put } from 'redux-saga/effects' import { path } from 'ramda' import GithubActions from '../Redux/GithubRedux' export function * getUserAvatar (api, action) { const { username } = action // make the call to the api const response = yield call(api.getUser, username) if (response.ok) { const firstUser = path(['data', 'items'], response)[0] const avatar = firstUser.avatar_url // do data conversion here if needed yield put(GithubActions.userSuccess(avatar)) } else { yield put(GithubActions.userFailure()) } }
其中action是之前的state数据, 后面的则是直接根据异步获取的数据执行对应redux的Action。
数据获取 真实的数据获取使用apisauce包。
1
2
3
4
5
6
7
8
9
10
11
12
13
14
15
16
17
18
19
20
// 实例化 const create = (baseURL = 'https://api.github.com/') => { const api = apisauce.create({ // base URL is read from the "constructor" baseURL, // here are some default headers headers: { 'Cache-Control': 'no-cache' }, // 10 second timeout... timeout: 10000 }) const getRate = () => api.get('rate_limit’) return { getRate } } export default { create }
这里是不算复杂的实例化,创建一个数据获取接口,设定了url, baseURL, httpHeader, 以及超时时间。apisauce文档 :
1
2
3
4
5
6
7
8
9
10
11
12
13
14
15
16
17
18
const api = create({baseURL: 'https://api.github.com'}) const api = create({baseURL: 'https://example.com/api/v3'}) const api = create({ baseURL: '...', headers: { 'X-API-KEY': '123', 'X-MARKS-THE-SPOT': 'yarrrrr' } }) const api = create({baseURL: '...', timeout: 30000}) // 30 seconds api.get('/repos/skellock/apisauce/commits') api.head('/me') api.delete('/users/69') api.post('/todos', {note: 'jump around'}, {headers: {'x-ray': 'machine'}}) api.patch('/servers/1', {live: false}) api.put('/servers/1', {live: true}) api.link('/images/my_dog.jpg', {}, {headers: {Link: '<http://example.com/profiles/joe>; rel="tag"'}}) api.unlink('/images/my_dog.jpg', {}, {headers: {Link: '<http://example.com/profiles/joe>; rel="tag"'}})
而mock的就更简单了, 直接就是就是写死的对象,里面包含若干方法,返回写死的数据。
调试 调试使用Reactotron, 为了使用它我们可以下载它的客户端 ,使用它不进可以直接console数据到面板,同时可以直接修改redux状态反馈到reactNative的UI层上。关于它的使用,在startup里面有几个例子,已经足够使用了。
1
2
3
4
5
6
7
8
9
10
11
12
13
14
15
16
console.tron.log('Hello, I\'m an example of how to log via Reactotron.') console.tron.log({ message: 'pass objects for better logging', someGeneratorFunction: selectAvatar }) console.tron.display({ name: '🔥 IGNITE 🔥', preview: 'You should totally expand this', value: { '💃': 'Welcome to the future!', subObject, someInlineFunction: () => true, someGeneratorFunction: startup, someNormalFunction: selectAvatar } })
简单写个Demo App LaunchScreen 正常app启动是这样的splash页面->LaunchPage(常见的就是滑屏简介)->主页。splash页面比较折腾,而且在很多博客都有说道,这里我们开始写一个LaunchPage页面作为开始。npm i react-native-swiper --save
最后修改一下LaunchScreen.js和最后修改一下LaunchScreenStyle.js
如上, 这样我们的LaunchScreen页面就算写好了。这里唯一需要写的就是flex布局问题。我在这里留了文本的位置,如果不需要完全可以删除只显示图片。
基本页面 这里打算做3个基本页面 Home OrderList MeInfo
建立页面并处理redux和sagas
1
2
3
ignite generate screen home ignite generate redux home ignite generate saga home
这样,相关文件建立就结束了。接下来处理导航。常规的导航,实际上可以直接 this.props.navigation.navigate('HomeScreen'),不过这样的问题是返回会返回到LaunchScreen,这样就很不合理了。所以做些简要处理:
1
2
3
4
5
6
7
8
9
10
import { NavigationActions } from 'react-navigation' const resetAction = NavigationActions.reset({ index: 0, actions: [ NavigationActions.navigate({ routeName: 'HomeScreen'}) ] }) // 执行: this.props.navigation.dispatch(resetAction)}
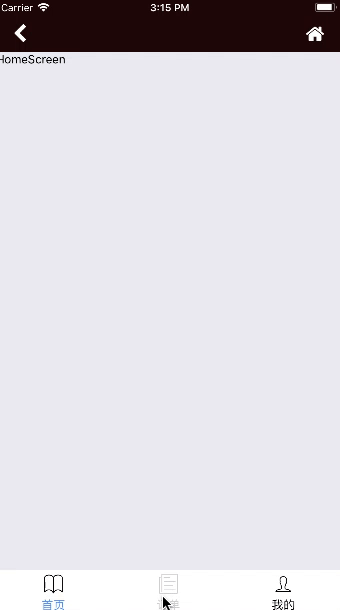
这样,我们就可以跳转到HomeScreen了,不过现在HomeScreen只有孤零零的’HomeScreen’字样。我们先加一下导航条。
处理一下AppNavigation.js
引入react 和 Icon组件
将headerMode改成screen
修改navigationOptions1 2 3 4 5 6 7 8 9 navigationOptions: ({navigation}) => { let {goBack, navigate} = navigation; return { headerStyle: styles.header, headerTitleStyle: styles.headerTitleStyle, headerLeft: <Icon name="chevron-left" onPress={()=>{goBack()}} size={24} color="#fff" style={{marginLeft: 20}} />, headerRight: <Icon name="home" onPress={()=>{navigate('HomeScreen')}} size={24} color="#fff" style={{marginRight: 20}} />, } }
这样,加上headerTitleStyle样式后,此时app就可以显示顶部导航条了。ignite generate component TabBar
1 2 3 4 5 6 7 8 9 10 11 12 13 14 15 16 17 18 19 20 21 22 23 onSelect (el) { if (el.props.name === this.state.page) { return false } else { this.setState({page: el.props.name}) console.tron.log(el.props.name) this.props.navTo(el.props.name) } } render () { return ( <Tabs selected={this.state.page} style={{ backgroundColor: 'white' }} selectedStyle={{ color: '#4F8EF7' }} onSelect={this.onSelect.bind(this)}> <Text name='HomeScreen' style={styles.textAlignCenter} selectedIconStyle={TabStyles}> <Icon name='ios-book-outline' size={30} color='#000' />{'\n'}首页 </Text> <Text name='OrderListScreen' style={styles.textAlignCenter} selectedIconStyle={TabStyles}> <Icon name='ios-paper-outline' size={30} color='#000' />{'\n'}订单 </Text> <Text name='MeInfoScreen' style={styles.textAlignCenter} selectedIconStyle={TabStyles}> <Icon name='ios-person-outline' size={30} color='#000' />{'\n'}我的 </Text> </Tabs> )
为了达到切换效果,我们再加两个Screen:
1
2
ignite generate screen orderList ignite generate screen meInfo
并为这两个页面添加Tabbar等操作(实际上可以直接单页tab切换,不过此处暂时不考虑那么多),做好之后(具体代码可以直接爬git的提交记录),现在tab切换是这样的:
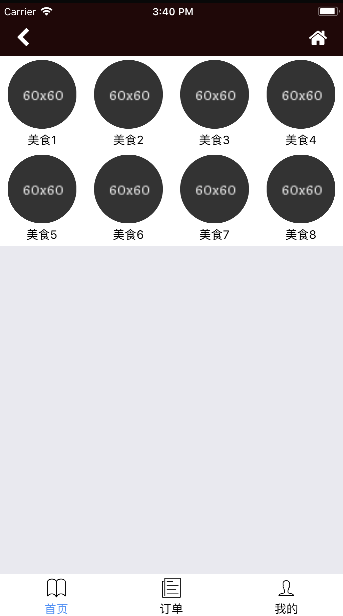
数据对接 简单完善下Home, 我们来做个非常普遍的2行4列图标,效果图是这样
1
2
3
4
5
6
7
8
9
10
11
12
13
14
15
16
17
const menus = [ { "name": '美食1', "icon": 'https://img.la/333/fff/60x60' }, ... ] <View style={styles.menuItemWrapper}> { menus.map(({name, icon},i)=>( <TouchableOpacity style={styles.menuItem} key={`icon-${i}`}> <Image source={{uri: icon}} style={styles.menuItemIcon}/> <Text>{name}</Text> </TouchableOpacity> )) } </View>
假设最终接口返回数据格式是:
1
2
3
4
5
6
7
{ code: 200, message: 'success', data: { menus: [{name: "xxx", icon: "xxx"}] } }
修改sagas/HomeSages.js, 将 response.ok 改成 +response.code === 200, 添加Fixtrues/home.json文件,内部填写上面的数据结构。这里因为没有后端所以直接mock本地数据,修改完毕后,更改Services/FixtrueApi.js
1
2
3
4
gethome: (data) => { const initData = require('../Fixtures/home.json') return {...initData} }
根据数据结构完善一下HomeRedux.js
1
2
3
4
5
6
7
8
9
10
11
const { Types, Creators } = createActions({ ... homeSuccess: ['data'], // 默认是payload ... }) ... // successful api lookup export const success = (state, action) => { const { data } = action // 默认是payload return state.merge({ fetching: false, error: null, data }) // 默认是payload }
注册sagas(mapDispatchToProps需要), 修改sagas/index.js文件
1
2
3
4
5
6
/* ------------- Types ------------- */ import { HomeTypes} from '../Redux/HomeRedux' /* ------------- Sagas ------------- */ import { getHome } from './HomeSagas' /* ------------- Connect Types To Sagas ------------- */ takeLatest(HomeTypes.HOME_REQUEST, getHome, api)
注册Redux(mapStateToProps需要), 修改redux/index.j文件
1
2
3
4
5
6
const rootReducer = combineReducers({ nav: require('./NavigationRedux').reducer, github: require('./GithubRedux').reducer, search: require('./SearchRedux').reducer, homeInitData: require('./HomeRedux').reducer, })
引入homeRedux,并更新HomeScreen页面mapStateToProps和mapDispatchToProps,并在componentDidMount内部执行获取数据的函数
1
2
3
4
5
6
7
8
9
10
11
12
13
14
15
16
17
18
19
import homeAction from '../Redux/HomeRedux' ... componentDidMount () { this.props.fetchData() } ... const mapStateToProps = ({homeInitData}) => { // 这个在redux那里定义 return { initData: homeInitData.data } } const mapDispatchToProps = (dispatch) => { return { fetchData: () => dispatch(homeAction.homeRequest()) } }
最后,将HomeScreen内部写死的menus删除,并将menus.map设为this.props.initData.menus.map, 这个流程就算结束了。
当然,如果有线上的服务器,不要忘记最后联调阶段,需要关闭useFixtures选项,并在Services/Api.js里面填充对应的逻辑,例如此处,需要在这里加gethome函数并返回指定的数据。
最后的成品截图
End 到这里Ignite最基础的使用已经完毕了,作为入门我个人认为已经足够。项目代码我已传至Github ,如果有需要可以自行检出取用。