目标
这一节分析一下react的声明周期
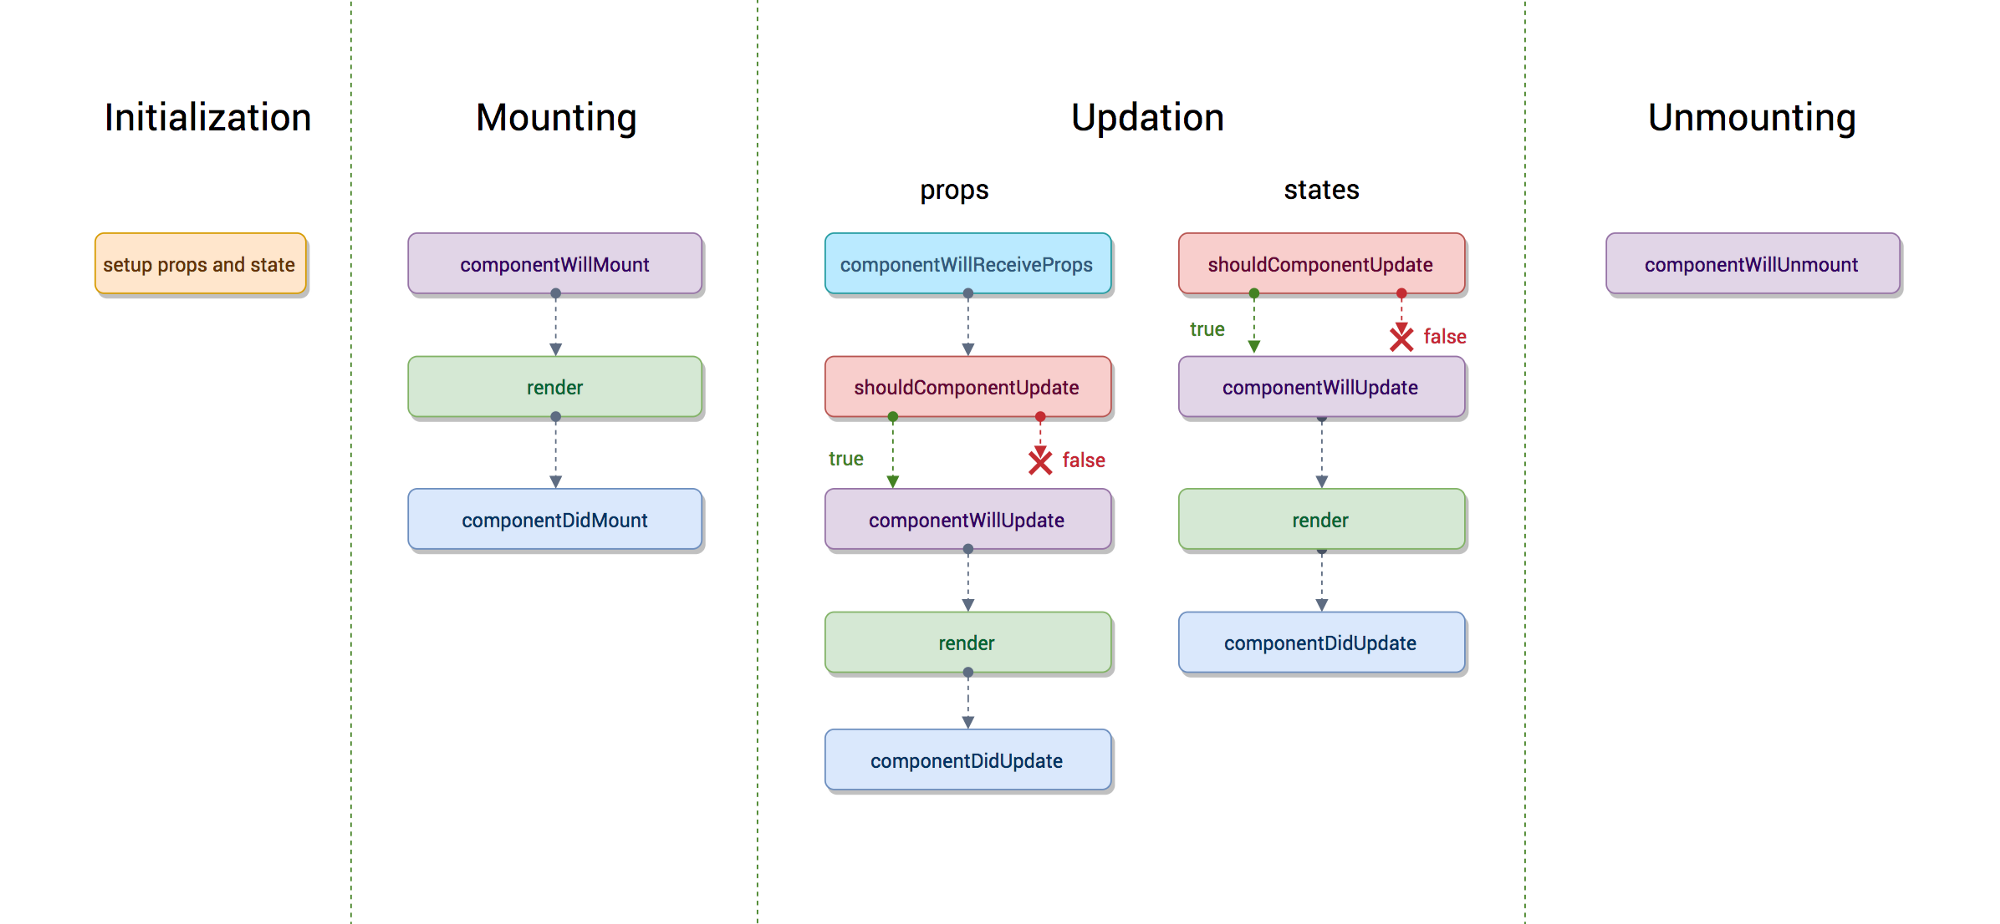
这里直接引用一下现有图片,图片来自这里
思考
这里需要认真思考一下的是:
- 钩子函数在一个组件里是按怎样的数据形式保存的
- 调用的时机在react内部是如何进行的
- 钩子函数是在哪些模块内被触发调用的
- 如何进行方便的调试和验证
步骤
我们还是依照测试文件直接debug。
目标文件为ReactComponentLifeCycle-test.js。这是react框架自带的lifecycle测试文件,我们不需要自己去写测试用例和DEMO。
初始化 Initialization
组件的props&&state初始化实质上和DOM无关,和更新相关生命周期也无关。
这里找到了ReactES6Class-test.js。使用下面的断言进行debug查看组件初始化环节。
1 | it('renders based on state using initial values in this.props', () => { |
我们在super(props)这里打一个断点开始debug,断点到了之后step into。然后点下一步直接跳到了src/isomorphic/modern/class/ReactBaseClasses.js。不过ES6这里定义过于简单了(直接走了构造器将props和state挂在上面了)看不出太深入的,所以我们继续向下深入render。
1 | function ReactComponent(props, context, updater) { |
这里断点放在render的return这一行,到了之后step into, 然后进入了src/isomorphic/classic/element/ReactElementValidator.js,光标放到line243点run to cursor,然后step into。这样就到了src/isomorphic/classic/element/ReactElement.js。
props这一块其实还是很容易理解,babel对jsx转换时候就将props传入了。
这个图其实说得很清晰了,我们主要分析state的处理。
getInitialState这个发生在组件产生之后,挂载之前。它是在mountComponentIntoNode中,具体一点的话,它的调用路径是这样的:
1 | mountComponentIntoNode |
之前对这个render是如何渲染到dom有过分析,完整的流程是这样的:
1 | ReactMount.render |
具体一些来说,我们的分析环节是在mountComponentIntoNode中,排除ReactMount._mountImageIntoNode调用之外的地方。
回顾一下
mountComponentIntoNode做了这些事:
- 调用ReactReconciler.mountComponent生成markup标记内部含有{children: markup数组, node:HTMLElement}
- 调用ReactMount._mountImageIntoNode渲染markup
ReactReconciler.mountComponent生成markup这一节在之前分析过,详细看之前的分析,这里只就关键的引用代码instantiateReactComponent做说明。
1 | function instantiateReactComponent(node, shouldHaveDebugID) { |
之前我们说到过instance = ReactHostComponent.createInternalComponent(element);的情况,然而我们关注的getInitialState,事情恰好发生在instance = new ReactCompositeComponentWrapper(element);
回顾instantiateReactComponent,看看ReactCompositeComponentWrapper的定义
1 | var ReactCompositeComponentWrapper = function(element) { |
此时,生成markup的代码实质上是调用ReactCompositeComponent.mountComponent
1 | var markup = internalInstance.mountComponent( |
然而这个例子这里存在internalInstance.mountComponent被调用了两次的问题
第一次渲染
第一次渲染是TopLevelWrapper组件的渲染
在ReactCompositeComponent.mountComponent节点的函数中,可以看到inst.state = initialState = null
而这个inst是_constructComponent的返回值,所以最终的定义就在这个函数内部了,重点跟踪一下这个引用好了。
这个函数内部引用了ReactCompositeComponent._constructComponentWithoutOwner,这里核心代码引用到了Component(publicProps, publicContext, updateQueue) ,
这里的Component是_currentElement.type的引用,debugger断点打过来,最简单的元素初始渲染这里是TopLevelWrapper实例(同时也是Component实例)。
可以看到此时initialState === undefined,所以它最后被赋值为null了。
第一次定义state这里 仅仅相当于是一个初始化流程。最终定义还是看后面的定义
第二次渲染
到了第二次时候 也就是performInitialMount内执行到
1 | var markup = ReactReconciler.mountComponent( |
这一块代码时候触发的(关于这个第一次和第二次这个,可以参考后面提到的『jsx到js的转换 』)。
此时child是ReactCompositeComponentWrapper实例所以markup生成还是调用ReactCompositeComponent.mountComponent。
这时候就是我们的Foo组件了。这里获取实例使用了ReactReconciler._constructComponent,它又调用了_constructComponentWithoutOwner。它大致代码如下:
1 | _constructComponentWithoutOwner: function( |
我们在之前代码里面可以找到this._currentElement = element,所以它实质上调用的是ReactElement实例的type属性。这个属性在这里对应的是我们的Foo函数。而Foo在构造器里面对state做了定义。这里就是state数据被录入的根源环节。
但是Initialization此刻还没有完毕。继续往下走,直到ReactCompositeComponent.js line252-320这几行都执行完毕,我们的Initialization环节才正式完毕
1 | inst.props = publicProps; |
by the way,我们再往下走一些,可以看到
1 | if (inst.componentDidMount) { |
是的componentDidMount在初始化完毕后就接着被调用了。
PS:上面提到了type属性,这里再次温习一下jsx到js的转换防止一知半解。
jsx到js的转换
1 | class Bar extends React.Component { |
这里需要注意的是:
- React.createElement返回值是一个ReactElement对象, 但是它本身则是一个Function
- 对 a|b|c标记的createElement来说,他们的返回值的type是一个Function,对应的是组件的定义函数
- 对 a|b|c标记的createElement来说,他们的第一个参数并不真的就是直接传入React.createElement这个函数,而是组件的定义函数的转译(bable处理),它里面一定会有一个render,render里面会调用React.createElement()返回一个ReactElement对象
- 而对于d标记的createElement来说,它的返回值是一个ReactElement对象。
关于这个render的调用。参见ReactCompositeComponent.performInitialMount
1 | // If not a stateless component, we now render |
一路跟进引用最终你会发现render在这里被调用了。
挂载 Mounting
componentWillMount
这个函数在ReactCompositeComponent.performInitialMount中
1 | if (inst.componentWillMount) { |
componentDidMount
这个不再废话,参见上文的『第二次渲染』。ReactCompositeComponent.mountComponent中
render
render这个也不再说了,参见『 jsx到js的转换』。ReactCompositeComponent.performInitialMount中,更细致一些,那就是在ReactCompositeComponent._renderValidatedComponent中。
更新 Updation
更新这个环节的钩子函数需要配合分析: 当收到新的props、state时,会发生什么?
不然就会发生这些钩子函数好找,但是何时会被触发却不明确的问题。
我们之前分析过render的流程,所以这里顺便也分析一下,update的流程。
State更新
观察State更新需要对这个更新是怎样被唤起的,所以会分为之前和之后两个环节。
Before 更新之前
这里使用这个测试用例(ReactES6Class-test.js里面)来测试观察state更新环节来对整体逻辑做初步概览。
1 | it('setState through an event handler', () => { |
这个setState的调用的定义在:
1 | ReactComponent.prototype.setState = function(partialState, callback) { |
step in方式进入了ReactUpdateQueue.enqueueSetState,进行了一些验证后,将这个state纯对象push进入了internalInstance._pendingStateQueue数组,然后调用ReactUpdates.enqueueUpdate(internalInstance)来更新这个组件。
1 | function enqueueUpdate(component) { |
这个函数的调用有些绕而且看起来必要性不高因为ReactDefaultBatchingStrategy.batchedUpdates在此时必然会执行到transaction.perform(callback, null, a, b, c, d, e)——实质上它是callback(a, b, c, d, e)的事务版本,执行有前后置条件。最后调用自身将component推到dirtyComponents进行更新标记。
1 | batchedUpdates: function(callback, a, b, c, d, e) { |
在这个debug环节,transaction.perform基本就是一个大体的调用终点了。But,这个更新Component的调用去哪儿了?
这里不得不说事务概念了,ReactDefaultBatchingStrategy的事物实例是有两个事务注册的:
1 | var RESET_BATCHED_UPDATES = { |
我们都更新环节就是在ReactUpdates.flushBatchedUpdates.bind(ReactUpdates)这里。
1 | var flushBatchedUpdates = function() { |
这样,当我们处理好了函数执行之后,组件也会随之被runBatchedUpdates更新。这其中还有很多细节,但是这里仅仅做好整理逻辑梳理即可,暂时不做细致分析(但是很显然,相关更新的钩子函数会在里面)。
After 正式开始
继续上一步分析。在这个例子中,执行到runBatchedUpdates后,这里的更新最终会执行到ReactCompositeComponent.updateComponent。所以后面的生命周期函数都会在这里一一展现。这里回顾一下更新环节生命周期的顺序。
1 | shouldComponentUpdate |
shouldComponentUpdate
ReactCompositeComponent line 838-860
1 | if (!this._pendingForceUpdate) { |
这一步生命周期完成之后我们进入了ReactCompositeComponent._performComponentUpdate(具体流程参见ReactCompositeComponent.updateComponent)
componentWillUpdate
ReactCompositeComponent line 955-965
1 | if (inst.componentWillUpdate) { |
render
ReactCompositeComponent line 973
1 | this._updateRenderedComponent(transaction, unmaskedContext); |
componentDidUpdate
ReactCompositeComponent line 975-1002
这一步还是很好理解,如果有定义这个函数,那么就通过事务机制再render完成之后执行componentDidUpdate。至此State更新环节的流程就完整、畅通了。
1 | if (hasComponentDidUpdate) { |
Props更新
props引起的更新可能会不太容易理解。
setState这个是一个函数理解它的触发没有太大难度。这里回顾一下props和state的区别: state是组件内部的状态,是可以修改;而props是父组件上传下来的,他不能在组件内部被修改。
Before 更新之前
为了辅助说明,这里还是使用上面提到过的测试用例,但是我们这里换个角度来看这个用例。
1 | it('setState through an event handler', () => { |
稍微分析一下这个测试用例,可以看到Inner组件在handleClick被触发以后,它的this.props.name的值从foo变为了bar。所以我们这里重点分析一下,这个变化是如何最终反应到DOM上的。
在一切开始之前,我们还是得回顾,这个this.props.name到底是如何传递到Inner组件上的——this.setState,是的,就是this.setState。
回顾一下state的钩子函数触发顺序:
1 | shouldComponentUpdate |
实际上此时,对于Inner来讲,它在State钩子函数的render环节,我们就开始了一轮Props的更新生命周期函数。
在这个环节中,有几个特别关键的地方值得深思(理解它有助于深入理解React)。
- 『jsx到js的转换』 环节里面jsx 转换为React.createElement的结构,和提到的相关的注意项
- React.createElement嵌套的层级问题,它不仅仅可以从TopLevelWrapper开始渲染,实际上,他可以从任意中间的任何一个React.createElement开始渲染
- 为什么说React是最小局部更新?除了调度和算法的作用,React.createElement嵌套结构可以从任何环节开始向下级渲染,是一个非常关键的机制,它极大程度上缩小了需要更新到DOM的数据。
以上可能是最重要的,如果没有理解上面的那么值得卡在这里琢磨。
After 正式开始
如果上面的准备就绪了可以继续下面的了。回顾一下,当state触发的生命周期开始render环节的时候,会执行ReactCompositeComponent line 973的代码这里仅仅是比State多一个componentWillReceiveProps。
1 | this._updateRenderedComponent(transaction, unmaskedContext); |
这里直接在测试用例的attachedListener()这一行打一个断点,待它停住以后,在render里面打一个断点,最后点执行。当它再次停住以后,这样我们就捕获了state之后的render环节。最后将光标定位到ReactCompositeComponent line 973,点run to corsur,我们就对程序进行了精准的捕获。
接下来它的调用栈:
1 | ReactCompositeComponent._updateRenderedComponent |
到这个环节生命周期函数的调用就简单多了。先看整体的生命周期:
1 | componentWillReceiveProps |
componentWillReceiveProps
ReactCompositeComponent.updateComponent内, ReactCompositeComponent.js line 823-833
1 | if (willReceive && inst.componentWillReceiveProps) { |
shouldComponentUpdate
ReactCompositeComponent.updateComponent内, ReactCompositeComponent.js line 838-860
1 | if (!this._pendingForceUpdate) { |
componentWillUpdate
ReactCompositeComponent.updateComponent 调用了ReactCompositeComponent._performComponentUpdate。
这个生命周期执行在这个函数内, 代码定位line955-965
1 | if (inst.componentWillUpdate) { |
render
ReactCompositeComponent._performComponentUpdate内
1 | this._updateRenderedComponent(transaction, unmaskedContext); |
componentDidUpdate
ReactCompositeComponent._performComponentUpdate内
1 | if (hasComponentDidUpdate) { |
卸载
卸载这个环节的生命周期就比较好理解了。
我们的render环节会调用一个ReactCompositeComponent._updateRenderedComponent。
这个函数又一个非常显眼的逻辑分支。
1 | if (shouldUpdateReactComponent(prevRenderedElement, nextRenderedElement)) { |
ReactReconciler.receiveComponent这个方法里面调用了internalInstance.unmountComponent(safely),它可以对各种组件实例的unmountComponent进行调用。
常规来说,我们最常用到的是是ReactCompositeComponent.unmountComponent。其中内容不再赘述。
总结
至此整个React的声明周期分析也算完整了。我们整体的分析了初次渲染、更新、卸载过程中的生命周期函数式如何被调用、在哪里调用,以及涉及到相关知识点,乃至如何进行方便的调试。